> ## Documentation Index
> Fetch the complete documentation index at: https://docs.switch.vaultera.co/llms.txt
> Use this file to discover all available pages before exploring further.
# Activate Connector on Vaultera Switch
> Learn how to activate and configure connectors in Vaultera Switch Control Center
## Overview
Connectors are the bridge between Vaultera Switch and various payment service providers. By activating a connector, you enable your application to process payments through that specific payment gateway.
## Steps to Activate a Connector
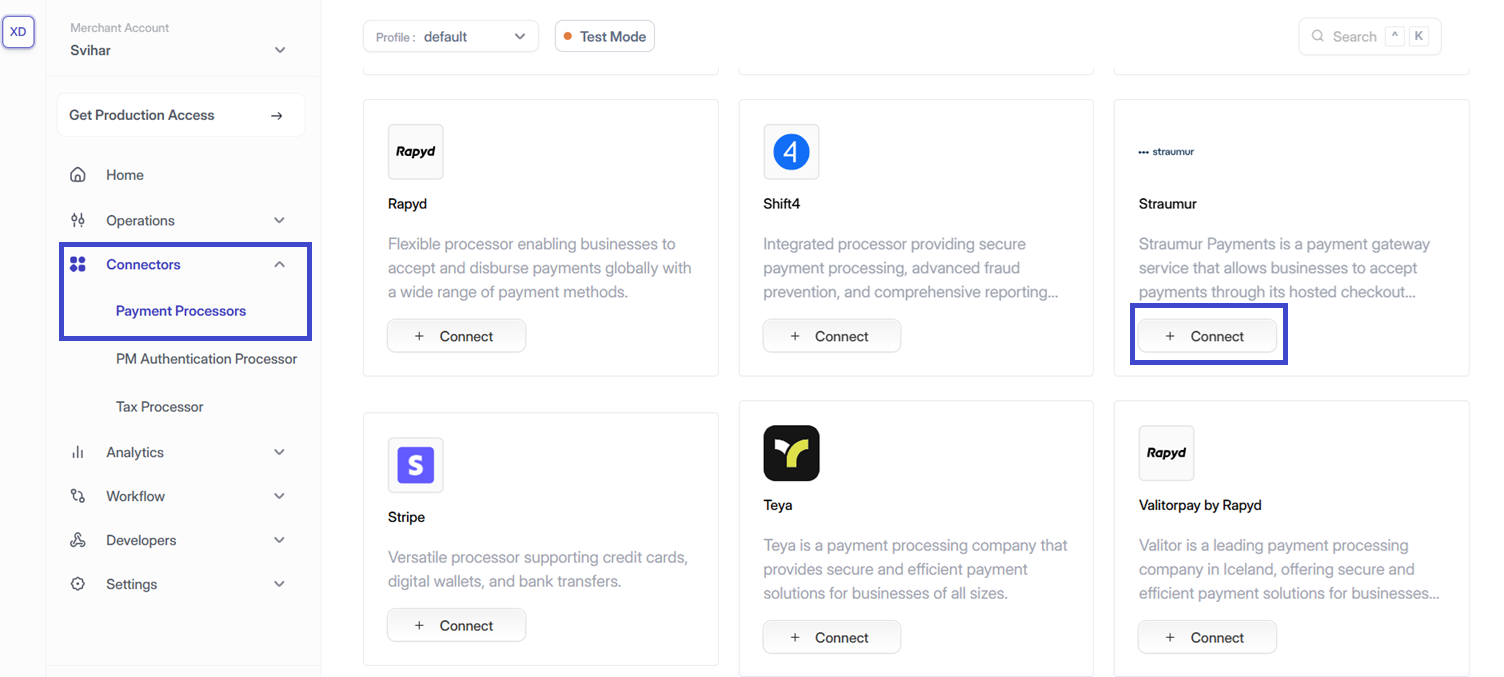
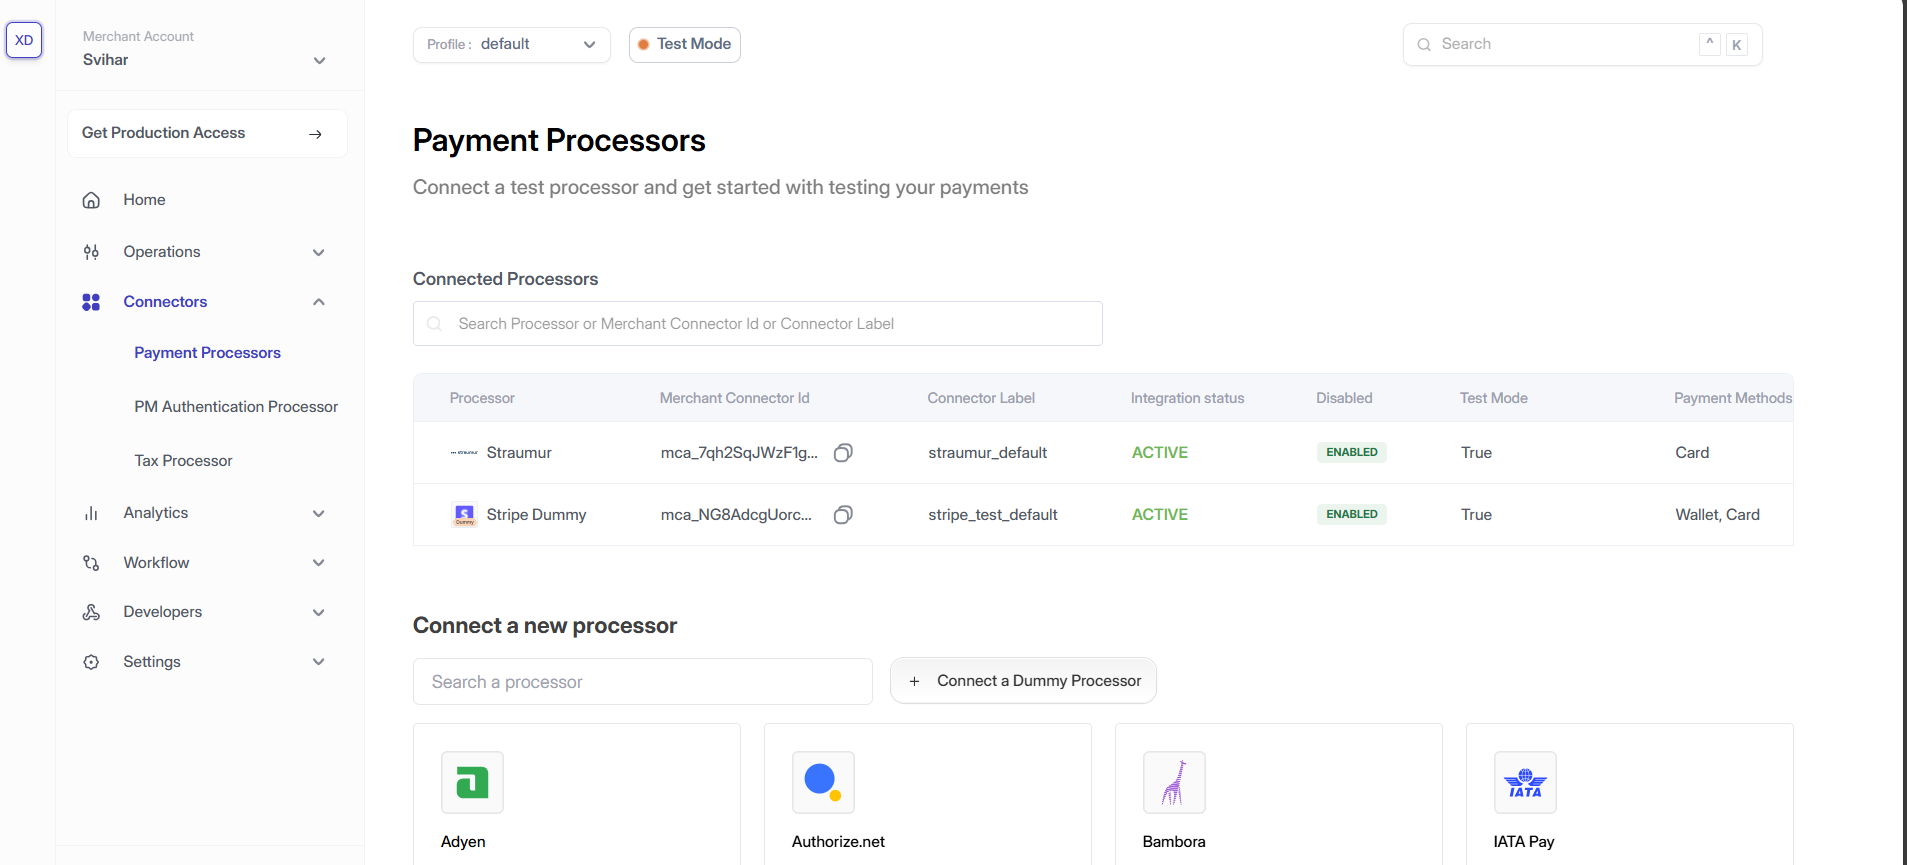
### Step 1: Access the Connectors Section
* Navigate to the **Connectors** section in the Vaultera Switch Control Center
* Click the **'+ Connect'** button next to the connector you wish to activate
You can find the Connectors section in the main navigation menu of your Control Center dashboard.
 ### Step 2: Profile Details
* The **Profile ID** is selected automatically in the Vaultera Switch Control Center
* To change it, use the dropdown in the top-right corner of the dashboard
Each profile can have different connector configurations. Make sure you're working with the correct profile for your use case.
### Step 2: Profile Details
* The **Profile ID** is selected automatically in the Vaultera Switch Control Center
* To change it, use the dropdown in the top-right corner of the dashboard
Each profile can have different connector configurations. Make sure you're working with the correct profile for your use case.
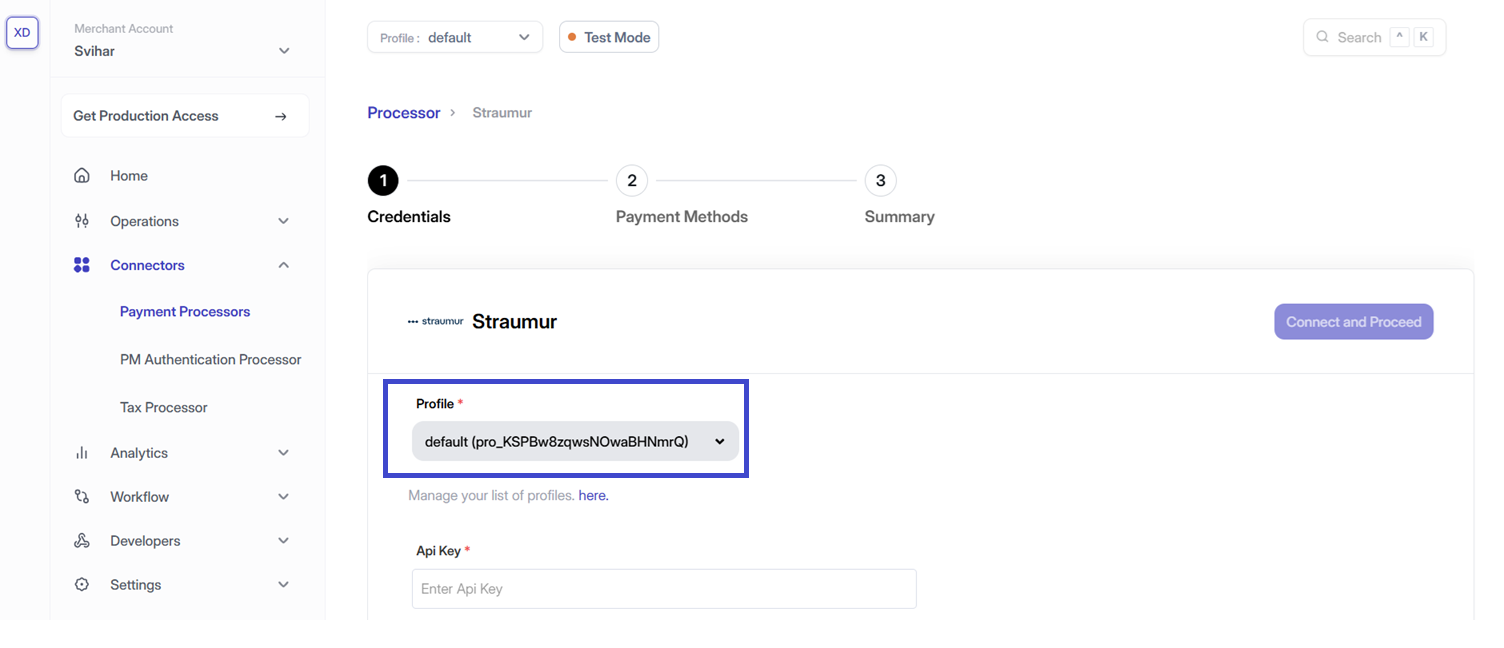 ### Step 3: Configure Connector Details
Enter the required credentials for the selected connector:
* **API Keys & Credentials**: These can typically be found during sign-up or in your connector's dashboard
* **Connector Identifier**: Define a unique identifier for the connector under your business profile
* **Source Verification Key**: If applicable, provide this to ensure webhook authenticity
Always keep your connector credentials secure and never share them publicly. Vaultera Switch encrypts all sensitive information.
### Step 3: Configure Connector Details
Enter the required credentials for the selected connector:
* **API Keys & Credentials**: These can typically be found during sign-up or in your connector's dashboard
* **Connector Identifier**: Define a unique identifier for the connector under your business profile
* **Source Verification Key**: If applicable, provide this to ensure webhook authenticity
Always keep your connector credentials secure and never share them publicly. Vaultera Switch encrypts all sensitive information.
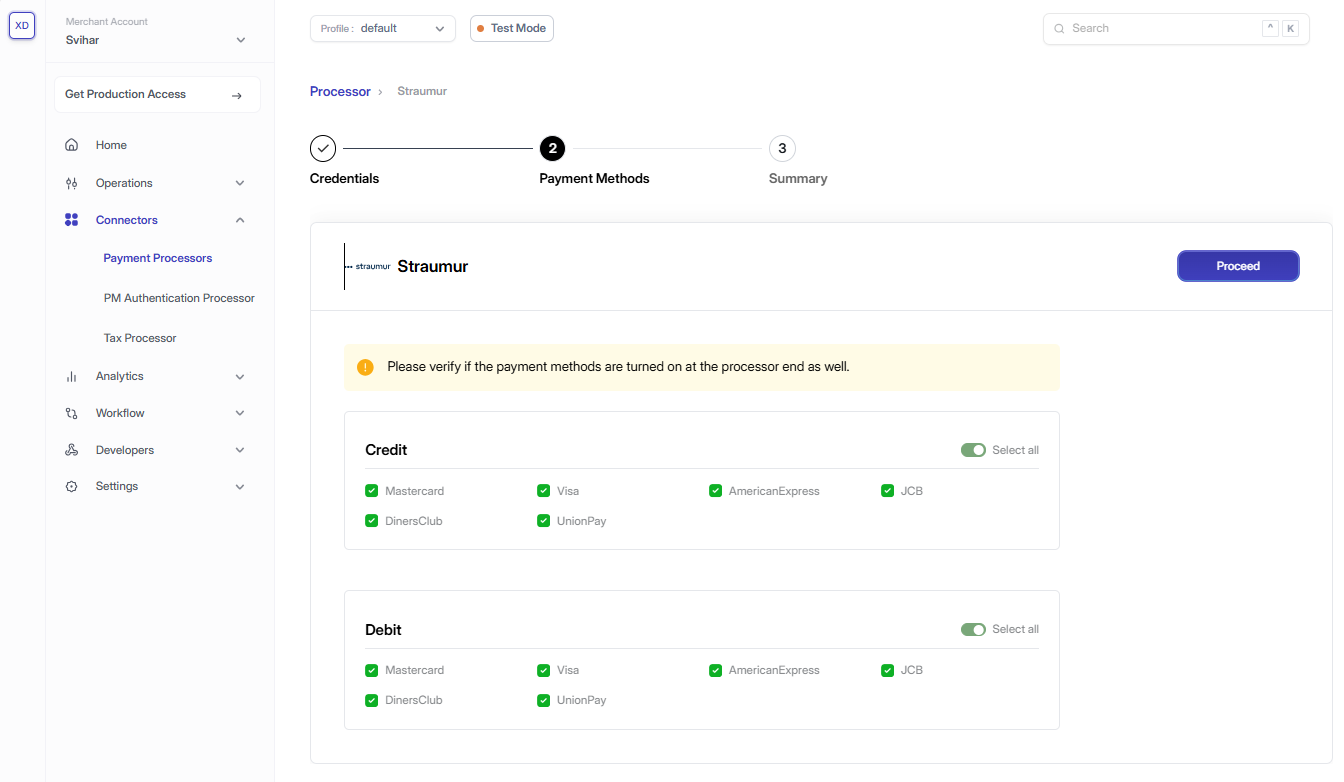
 ### Step 4: Enable Payment Methods
Select the payment methods that should be available during the demo checkout:
* Credit/Debit Cards
* Digital Wallets
* Bank Transfers
* Alternative Payment Methods
### Step 4: Enable Payment Methods
Select the payment methods that should be available during the demo checkout:
* Credit/Debit Cards
* Digital Wallets
* Bank Transfers
* Alternative Payment Methods
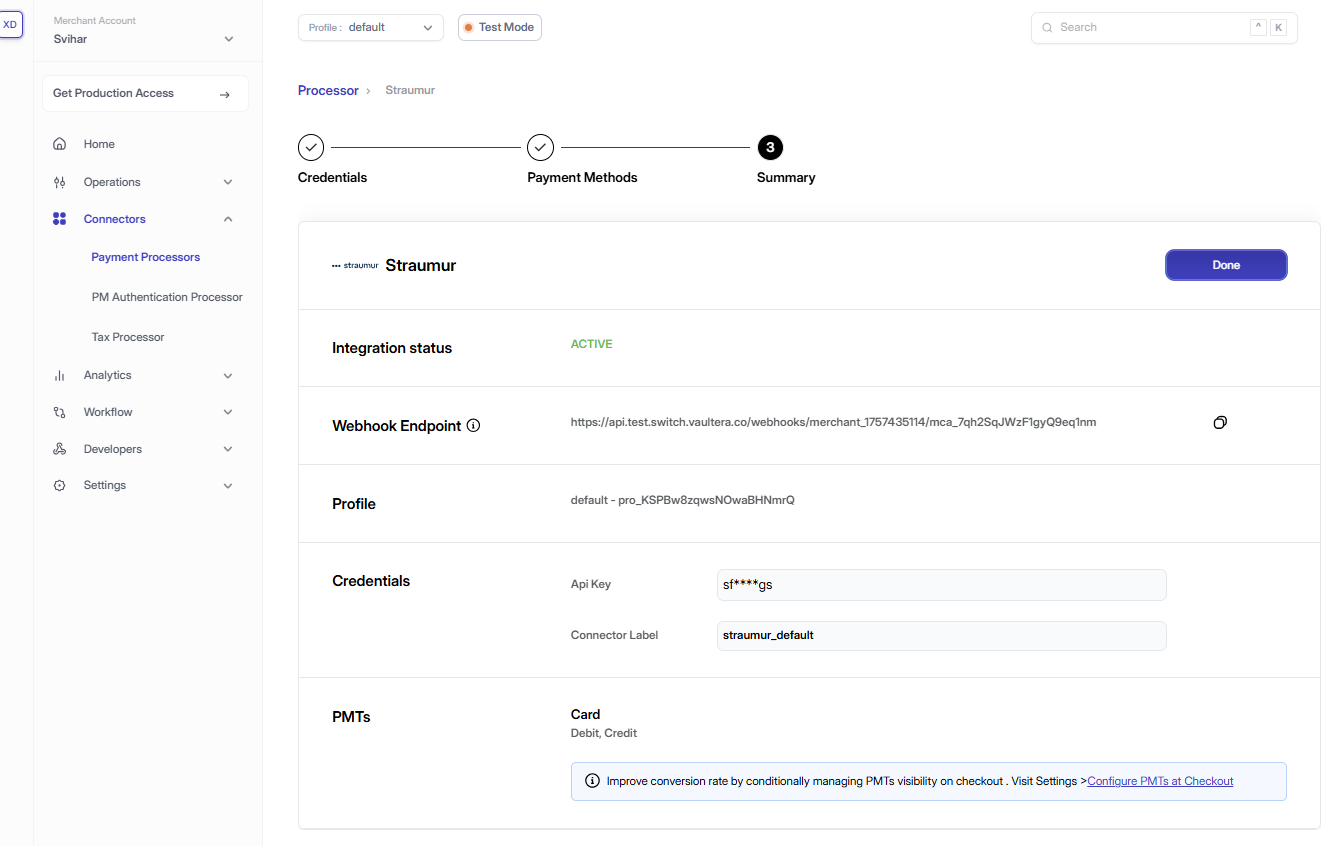
 ### Step 5: Configure Webhooks (Optional)
If your selected connector supports webhooks:
1. Copy the webhook URL from the Vaultera Switch Control Center
2. Paste and configure it in your connector's dashboard
3. Test the webhook connection to ensure proper communication
Webhooks provide real-time updates about payment status changes, improving your application's responsiveness.
### Step 5: Configure Webhooks (Optional)
If your selected connector supports webhooks:
1. Copy the webhook URL from the Vaultera Switch Control Center
2. Paste and configure it in your connector's dashboard
3. Test the webhook connection to ensure proper communication
Webhooks provide real-time updates about payment status changes, improving your application's responsiveness.
 ## Test Your Integration
Once the connector is set up, you can test it by initiating a demo payment:
1. Use the **Test Payment** feature in the Control Center
2. Verify that payments are processed correctly
3. Check that webhooks (if configured) are receiving updates
## Edit Connector Credentials
To update connector credentials, you must re-enter all required credential fields.
### Steps to Update Credentials
#### Step 1: Access the Connectors Section
* Navigate to the **Connectors** section in the Control Center
* Here, you'll see a list of all existing connector integrations for the selected profile
## Test Your Integration
Once the connector is set up, you can test it by initiating a demo payment:
1. Use the **Test Payment** feature in the Control Center
2. Verify that payments are processed correctly
3. Check that webhooks (if configured) are receiving updates
## Edit Connector Credentials
To update connector credentials, you must re-enter all required credential fields.
### Steps to Update Credentials
#### Step 1: Access the Connectors Section
* Navigate to the **Connectors** section in the Control Center
* Here, you'll see a list of all existing connector integrations for the selected profile
 #### Step 2: Profile Details
* The **Profile ID** is auto-selected
* To Switch profiles, use the dropdown in the top-right corner of the dashboard
#### Step 3: Updating the Credentials
* Click the edit icon (📝) next to the connector's API keys
* A pop-up will appear where you can re-enter and save the updated credentials
When updating credentials, all existing payment processing will continue to work with the old credentials until the new ones are successfully saved and verified.
#### Step 2: Profile Details
* The **Profile ID** is auto-selected
* To Switch profiles, use the dropdown in the top-right corner of the dashboard
#### Step 3: Updating the Credentials
* Click the edit icon (📝) next to the connector's API keys
* A pop-up will appear where you can re-enter and save the updated credentials
When updating credentials, all existing payment processing will continue to work with the old credentials until the new ones are successfully saved and verified.
 ## Best Practices
* **Regular Updates**: Keep your connector credentials up to date
* **Testing**: Always test your integration after making changes
* **Monitoring**: Monitor your connector's performance and success rates
* **Documentation**: Keep track of your connector configurations for future reference
## Need Help?
If you encounter any issues while setting up or managing your connectors:
* Check the [Connector Documentation](/docs/connectors)
* Review the [Troubleshooting Guide](/docs/troubleshooting)
* Contact our [Support Team](mailto:switch@vaultera.com)
***
Your connector is now ready to process payments! Start by creating your first payment intent and testing the complete flow.
## Best Practices
* **Regular Updates**: Keep your connector credentials up to date
* **Testing**: Always test your integration after making changes
* **Monitoring**: Monitor your connector's performance and success rates
* **Documentation**: Keep track of your connector configurations for future reference
## Need Help?
If you encounter any issues while setting up or managing your connectors:
* Check the [Connector Documentation](/docs/connectors)
* Review the [Troubleshooting Guide](/docs/troubleshooting)
* Contact our [Support Team](mailto:switch@vaultera.com)
***
Your connector is now ready to process payments! Start by creating your first payment intent and testing the complete flow.